Developer Guide
FINUX
Table of Content
- Introduction
1.1 Purpose
1.2 Using this Guide - Setting Up
2.1 Setting up the project in your computer
2.2 Before writing code - Design
3.1 Architecture
3.2 UI Component
3.3 Parser Component
3.4 CommandHandler Component
3.5 Command Component
3.6 RecordList Component
3.7 CreditScoreReturnedLoansMap
3.8 Storage Component - Implementation
4.1 Add Feature
4.2 List Feature
4.3 View Feature
4.4 Return Feature
4.5 Remove Feature
4.6 Storage Feature
4.7 Credit Score Feature
Appendix A: Product Scope
Appendix B: User Stories
Appendix C: Non-Functional Requirements
Appendix D: Instructions For Manual Testing
1. Introduction
Greetings from Finux!
Finux is a Command-Line-Interface (CLI) Style application that allows the user to make better financial decisions based on the information recorded in the application. If you’re familiar with the CLI command interface, you will enjoy the benefit of speeding up your finance management rather than using the traditional management system.
Finux is written in Java 11 and uses the Object-Oriented Programming (OOP) paradigm. OOP enables us to produce organized and reusable codes, allowing efficient improvements and revisions in the future.
1.1 Purpose
This guide is for new and current developers of Finux. It describes the overall architecture
design of Finux and describes the current implementation details of our main features
with the thought process behind each of them. The current edition of this guide is meant for
the v2.1 release.
1.2 Using this Guide
Throughout the guide, you might encounter several icons, refer to the following consolidate list of icons:
Icon Meaning 💡 It indicates that this is an important piece of information. ❗ It indicates that this is a warning and you should be aware of it while developing. 📝 It indicates that this is a tip and you may find it useful when using our application or guide.
📝 Text that are blue like this example(jumps to 1.2), are clickable links that will move you to the relevant section of the guide.
📝 Records refer to either expenses, loans or savings.
📝 Pressing theHomebutton on your keyboard will bring you to the top of the Developer’s Guide when you want to refer to the table of content at any time.
2. Setting Up
2.1 Setting up the project in your computer
Ensure that you have the following installed:
- JDK 11
- Intellij IDEA (Highly Recommended)
Firstly, fork this repo and clone a copy into your computer.
If you plan to use IntelliJ IDEA:
- Ensure IntelliJ is configured to develop in JDK 11.
- Visit this website to get the latest method of configuring it: IntelliJ IDEA Help
- Import the project as a Gradle Project.
- Click on
Import Projectand locate thebuild.gradlefile and select it. ClickOK. - If prompted, choose to
Open as Project(notOpen as File). - Click
OKto accept the default settings but do ensure that the selected version ofGradle JVMmatches the JDK being used for the project. - Wait for the importing process to finish (it could take a few minutes).
- Click on
- Verify the setup.
- After importing successfully, locate the
src/main/java/seedu.duke/Finux.javafile, right click it, and chooseRun.... If the setup is correct, you should see the following: (This screenshot is taken on
 IntelliJ IDEA Community Edition 2020.3.1)
- After importing successfully, locate the
2.2 Before writing code
2.2.1 Configuring the Coding Style
If you are using IDEA, follow this guide IDEA: Configuring the code style to setup IDEA’s coding style to match ours.
2.2.2 Set up CI
There is no set up required as the project comes with GitHub Actions config files, located in .github/workflows
folder. When GitHub detects these files, it will run the CI for the project automatically at each push to the master
branch or to any PR.
2.2.3 Learn the Design
Before starting to write any code, we recommend that you have a look at Finux’s overall design by reading Finux’s Architecture section.
3. Design
3.1 Architecture
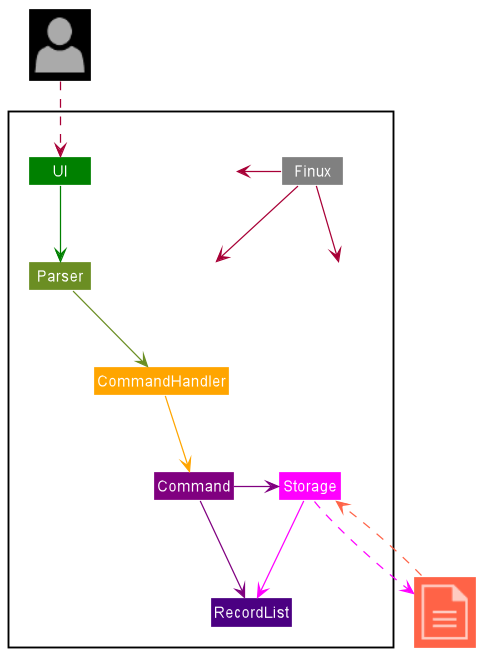
Figure 1: Finux Architecture Diagram
💡 The diagrams are built with PlantUML. The
.pumlfiles can be found in the diagrams folder and the generated picture diagrams are in the img folder.
The Architecture Diagram above details the high-level design of the Finux application. Brief explanations of the components involved are given below.
The Finux component is the object class itself, It is responsible for,
- At launch: Initializes the components in the correct sequence and attempts to load data from file.
- At shut down: Shuts down the components and invokes cleanup method where necessary.
The rest of the application consists of six main components.
Ui: The user interface (Ui) of the application which handles all user input and application output.Parser: The user input parser of the CLI.CommandHandler: The handler of parsed arguments for conversion into appropriateCommands.Command: The appropriate command to be executed.RecordList: The list of records of the application stored in memory.Storage: The storage manager that handles the saving of data, or data retrieval to/from file.
The application has another background component CreditScoreReturnedLoansMap that supports the credit score feature.
Given below are sequence diagrams describing the general application flow and how the different objects interact with each other.
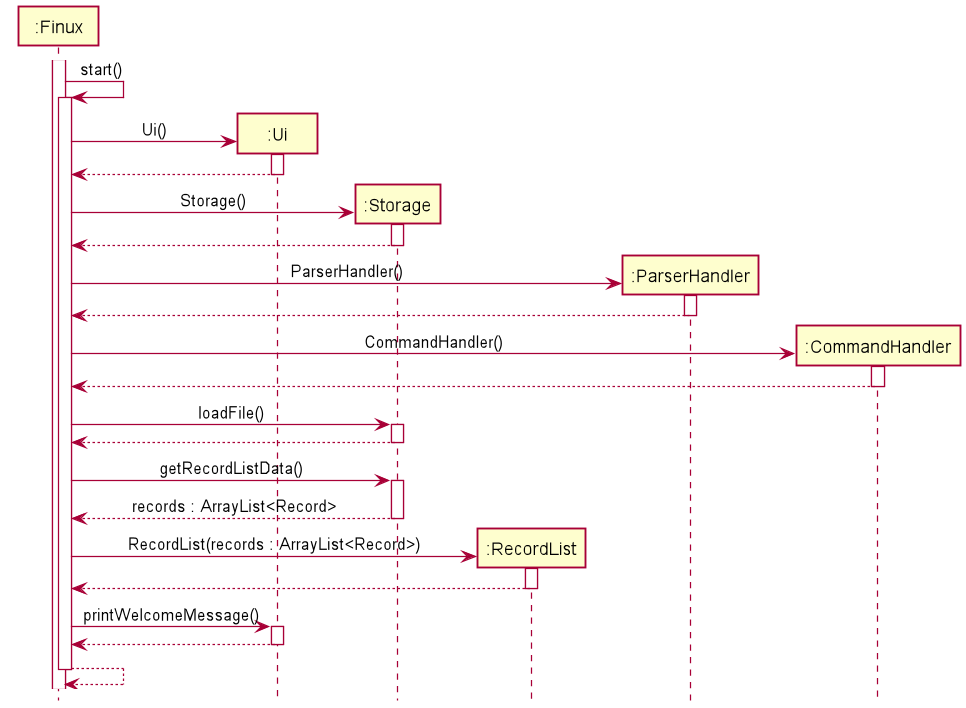
Figure 2: Initialization
The initialization sequence diagram above shows the systematic flow of object creation and record
retrieval from storage file for creation of the RecordList object.
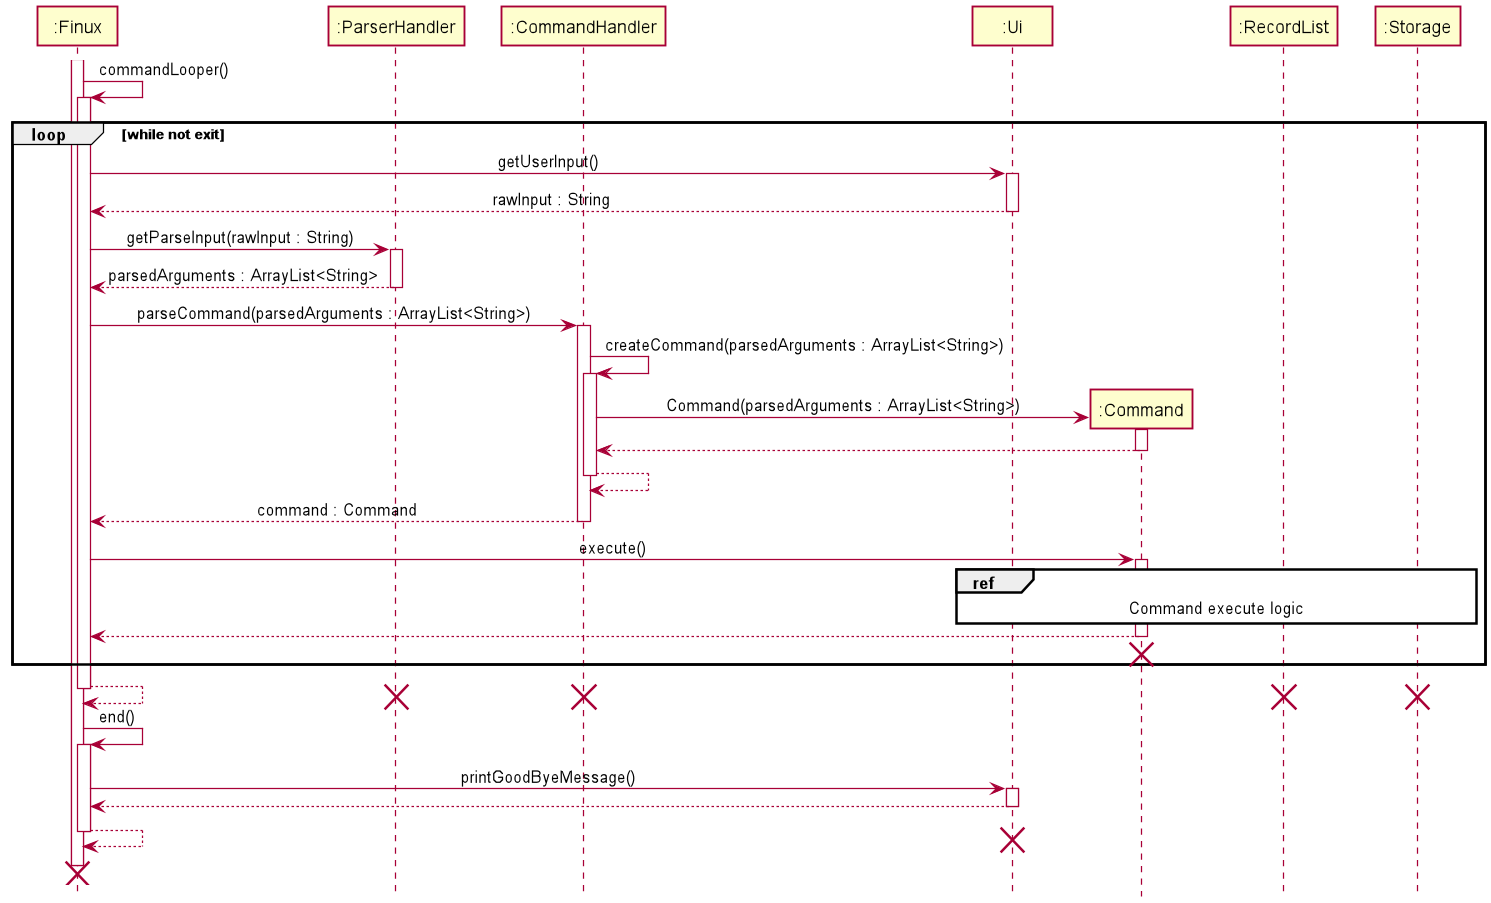
Figure 3: Main Application Loop & Exit Sequence
💡 The lifeline all objects should end at the destroy marker (X) but due to a limitation of PlantUML, the lifeline reaches the end of diagram. This limitation persists throughout all sequence diagram in this guide.
This sequence diagram follows suit after initialization in Figure 2.
This shows the main flow until the exit command is input by the user.
The following sections below will provide more details of each component.
3.2 UI Component

Figure 4: Ui Class Diagram
The Ui Component consists of a Ui class which handles all user input and system output.
The Ui is only dependent on the Finux class and does not interact directly with other classes,
ensuring a high level of cohesiveness, low level of coupling and separation of roles.
The Ui component actively listens for:
- the execution of commands to print the result of a
command
3.3 Parser Component

Figure 5: ParserHandler Class Diagram
Description
The Parser component consist of one class called ParserHandler.
The role of ParserHandler can be interpreted as a “manager” or “middle man” to parse
the user input from the console into an ArrayList<String> format.
Design
In the main program, ParserHandler is instantiated through the constructor new ParserHandler(). Whenever the
program needs to parse a user input, the ParserHandler calls the method getParseInput() and returns an
ArrayList<String>.
getParseInput()will trim the leading white space before callingstartExtraction().startExtractionwill check if the trimmed input starts with option. If yes, extract the option and remove the option from the trimmed input before callingextractSubsequentPart().extractSubsequentPart()will check for the next option index and extract whatever is in between the start of the trimmed input to the start of the next option index. This is the argument tagged after the option. Afterward, the checking mechanism will loop until no valid next options are left in the input before callingextractFinalPart().- Any leading or trailing white space of the argument field will be removed.
- If no argument is provided, the argument would be stored as an empty string.
extractFinalPart()will check if the final input ends with option. If yes, extract the option and add an empty string as the argument, else just add the final input to theArrayList<String>.- Finally, after the extraction to
ArrayList<String>is complete,extractFinalPart()will callcheckFirstBlock()for the final check to parse anyhelporcreditscorein the first argument block.
Parser Component Design Consideration
- Leading and trailing whitespace should be considered carefully especially with options involved.
- Input starting with valid option should consider the possibility of multiple leading whitespaces,
thus
stripLeading()should be applied. - Input ending with valid option should also be considered with possibility of multiple trailing whitespaces,
thus
stripTrailing()should be applied as well.
- Input starting with valid option should consider the possibility of multiple leading whitespaces,
thus
- Checking of options in the start, end, and during the processing should be considered carefully with accordance
to consideration 1.
- Starting option should be in the form of
'<option> 'with no leading whitespace and 1 trailing whitespace. e.g.'-e ' - Ending option should be in the form of
' <option>'with 1 leading whitespace and no trailing whitespace. e.g.' -e' - During the extraction, the next option should be in the form of
' <option> 'with 1 leading and trailing whitespace. e.g.' -e '
- Starting option should be in the form of
- As rearrangement of options is allowed, option detection should cater to non-fixed option order.
Apache Commons Lang, 3.11, providing the
StringUtilsclass is used to cater to consideration 2.StringUtils.startsWithAny()- detection of start option with non-fixed order.StringUtils.endsWithAny()- detection of end option with non-fixed order.StringUtils.indexOfAny()- detection of during processing option with non-fixed order.
- As multiple whitespaces is allowed, options and arguments should be fully trimmed (leading and trailing).
- As the
ArrayList<String>is passed back to the main program and is being used by CommandHandler, the argument field should be compulsory and appended with an empty string if it is empty to facilitate validations and option-argument pairwise logic. getParseInput()should always return a newArrayList<String>per new input.
3.4 CommandHandler Component
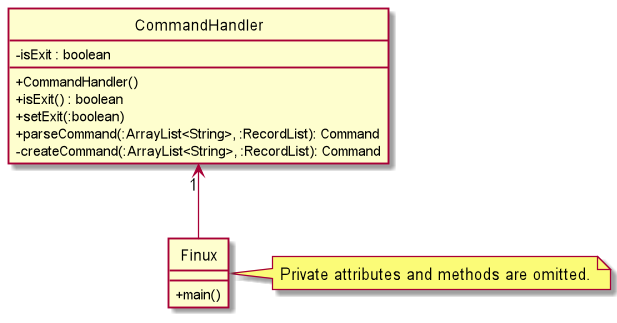
Figure 6: CommandHandler Class Diagram
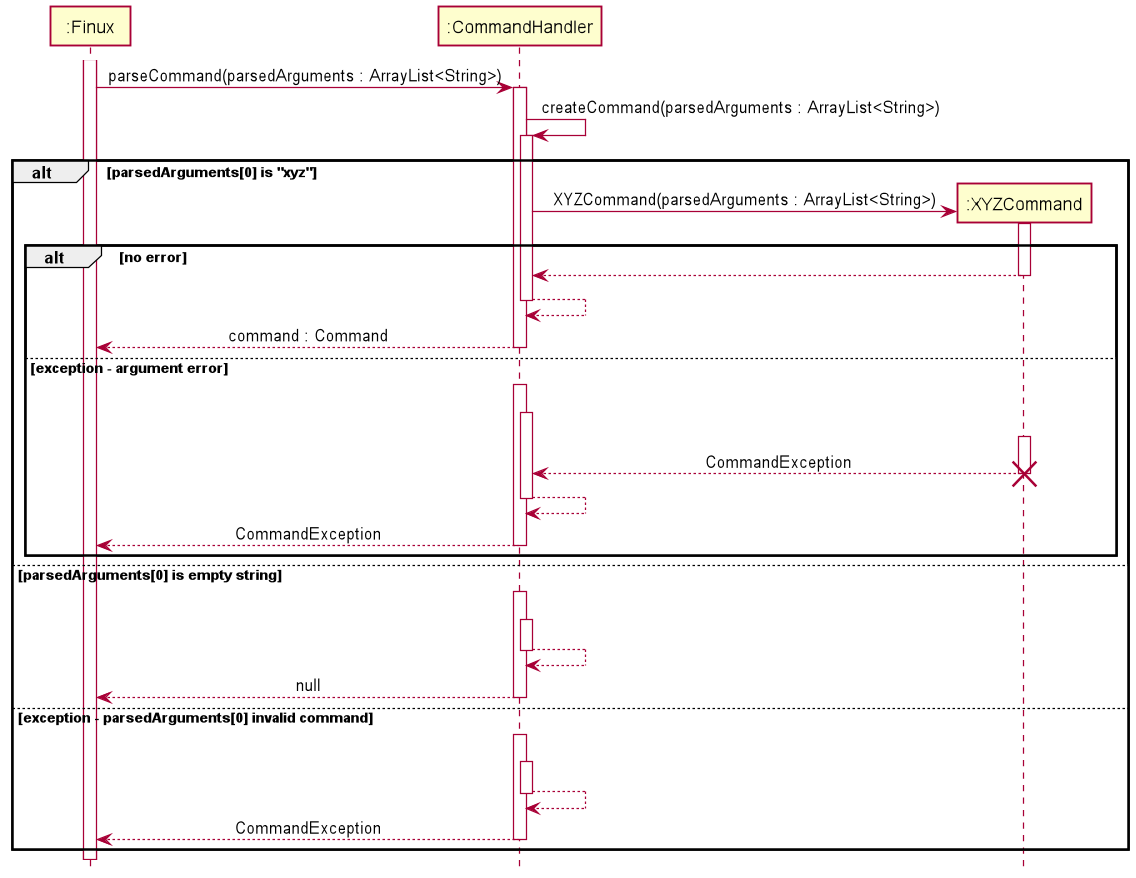
Figure 7: CommandHandler Sequence Diagram
Description
The CommandHandler component is the object class itself.
The role of the CommandHandler is to convert parsedArguments from the ParserHandler
into subsequent Command objects which will be executed thereafter.
The XYZCommand in Figure 7 represents a valid command word (e.g. "xyz") from the input
parsed earlier from the ParserHandler. More on the actual valid commands, please refer to
the Command Component below.
Design
It functions as a mapping from parsedArguments[0] to a set of predefined command words
(the actual commands of the Application).
With reference to the above Figure 7,
In the case of "xyz" being mapped to XYZCommand, depending on the other data in the
parsedArguments,
- arguments are valid: the
XYZCommandobject is successfully returned. - arguments are erroneous/invalid:
CommandExceptionis thrown.
If parsedArguments[0] maps to an empty String "", a null is returned, allowing the
Finux to continue prompting for user input.
Finally, if parsedArguments[0] cannot be mapped to any command, a CommandException is
thrown to Finux to handle.
Not stated explicitly in the diagrams, when the exit command is entered, the CommandHandler
sets the isExit = true, ending control of the commandLooper() and resulting in Finux
proceeding to call end() to exit the Application.
3.5 Command Component
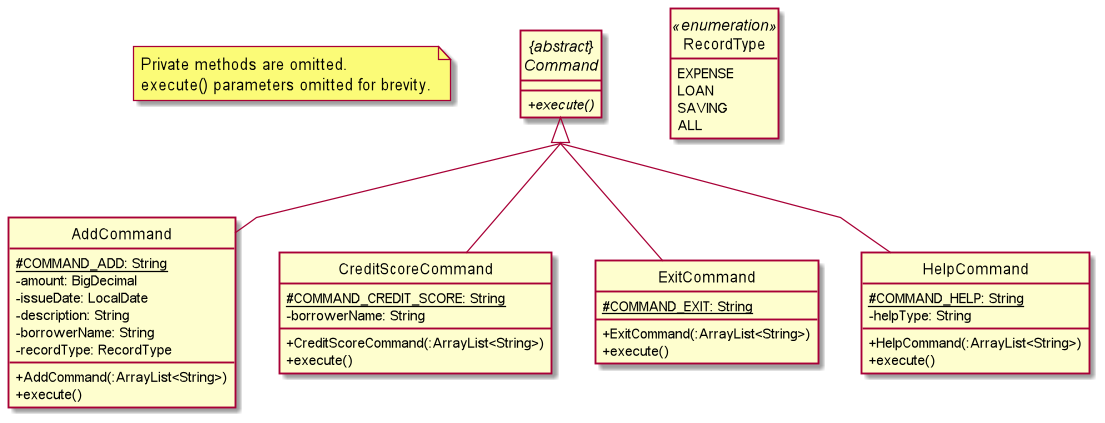
Figure 8: Command Class Diagram (Part 1)
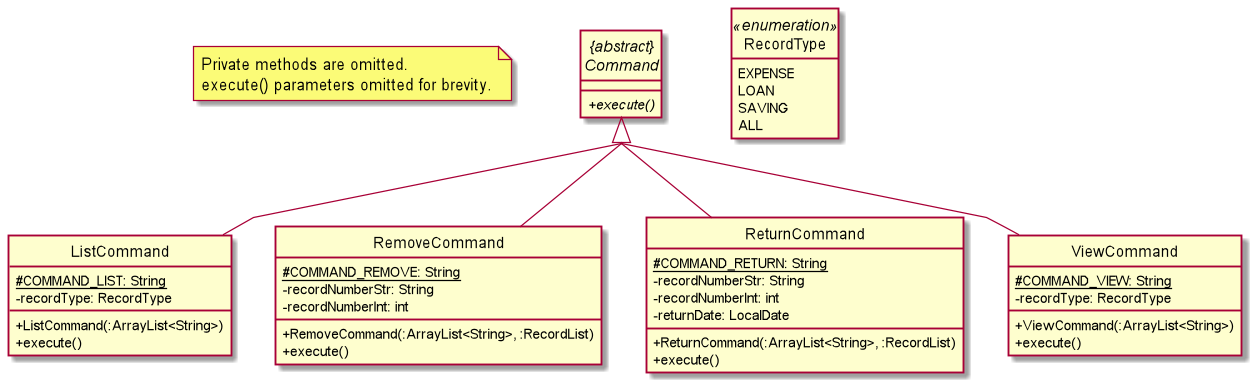
Figure 9: Command Class Diagram (Part 2)
All Commands contain a command word constant named as COMMAND_* (as underlined in Figure 8 & 9),
e.g. protected static final String COMMAND_XYZ = "xyz";
These constants are used by the CommandHandler to map to each Command.
3.5.1 Add Command
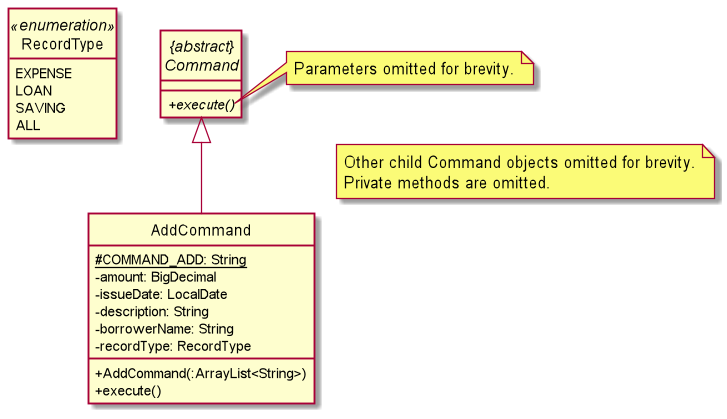
Figure 10: Add Command Class Diagram
In the case of AddCommand in the above Figure 10,
the resultant constant is ...final String COMMAND_ADD = "add";.
Below shows the command format the user has to type into the Application.
Command Format
Commands in Finux follow these argument orders (depending on the command):
CMD -OPT <FIELD> [-OPT <FIELD>...]CMD -OPTCMD { -OPT_1 ... | -OPT_2 ... | ... } ...CMD <FIELD>CMD [<FIELD>]CMDArgument types and notation:
CMD- a valid command.-OPT- an option, a letter preceded by a dash. E.g. “-i”.<FIELD>- an area where data is required.[...]- optional argument(s).{ ... | ... | ... }- mutually exclusive arguments,
e.g.{ -e | -l | -s }means thatview -e -shas a conflict with options-eand-s.Non-strict argument order:
Theaddandreturncommands do not require strict ordering for options.
E.g. For the case ofadd, option-acan come before/after option-d.
More on the different types of commands and usages, please refer to our User Guide.
Description
The Command component contains the abstract Command class and its extensions (child classes).
Each child class inherits the Command class.
The child classes of Command are the AddCommand, CreditScoreCommand, ViewCommand, etc…
Design
The only abstract method of Command is execute(...), where it is called by Finux everytime a Command
object is successfully created. Most of the input validation is done in the constructor of each Command object.
- Firstly, arguments are checked for validity (if any):
- Valid options: options accepted by each
Command. E.g.-aindicating the amount is valid for the commandadd. - No duplicate options: options are not repeated. E.g.
-a 200 -a 200or-l -lis invalid. - No conflict options: mutually exclusive options, options that cannot be input at the same time.
E.g. ViewCommand implements
{-e | -l | -s | -a}options,view -s -lis considered a conflict of options.
- Valid options: options accepted by each
- Secondly, option values are validated (if any):
- E.g. The input
return -i 2 -d 20122012has option values of"2"for-iand"20122012"for-d. Each option value is validated based on the input validation methods for each data type.
- E.g. The input
💡 The Command classes uses static validation methods from the Utils class. Some notable methods used are:
validateOptions(...): Checks arguments for invalid, duplicate and conflict options.validateArguments(...): Used to check for strict argument type ordering. Still requiresvalidateOptions(...)to check for argument validity.getOptionValue(...): Extracts the option’s value from arguments.
The RecordType enumeration
The use of RecordType is for later in the execution of the Command.
In the case of AddCommand (as seen in Figure 10), which supports options of {-e | -l | -s}, the constructor
will check which option was given, and sets the RecordType enumeration, recordType to the following:
-esetsrecordTypetoEXPENSE.-lsetsrecordTypetoLOAN.-ssetsrecordTypetoSAVING.
For other cases, like in the ViewCommand and ListCommand, it supports an additional -a option. This option
sets the recordType to ALL.
Command validation
If no violations are present in the arguments, then the subsequent Command object is returned.
If violations occur at any point of the input validation, the Command is not created and CommandException
is thrown back to the CommandHandler.
3.6 RecordList Component
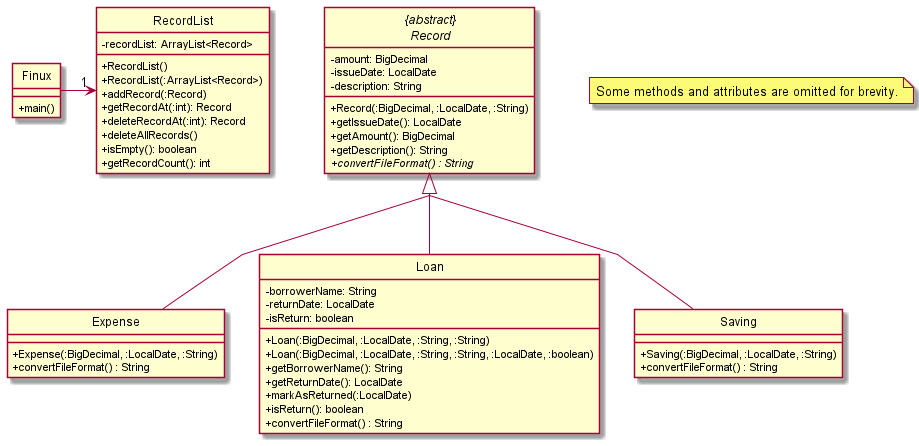 Figure 11: RecordList Class Diagram
Description
The RecordList component consists of only one class which is the RecordList. The role of the RecordList
is to maintain an internal ArrayList<Record> object created throughout Finux’s execution.
Design
This design follows the Object Oriented Programming (OOP) style, where operations
relating to the list can only be performed through the interfaces defined in the RecordList class. Doing so allows
us to restrict the access to the internal ArrayList<Record> from the external classes, successfully achieving the information
hiding aspect under the Encapsulation concept of OOP.
When Finux starts up, Finux instantiates the RecordList with data loaded from the save file, finux.txt. This is done
by the Finux class calling the constructor RecordList(ArrayList<Record>), passing in the ArrayList<Record> returned from the method
call storage.getRecordListData(). This ArrayList<Record> returned from storage.getRecordListData() is loaded from the save file
by a prior method call storage.loadFile(), also performed by the Finux class. For more information on Storage component,
refer to section 3.8.
When any of the commands of the listed features in section 4 are requested to run, Finux will pass
the RecordList into the execute() method call of the respective commands’ classes for their intended operations.
During runtime, any executions of the execute() method of AddCommand will instantiate either an Expense, Loan or
Saving object to be added to the RecordList via the addRecord() method call of the RecordList class.
Conversely, any executions of the execute() method of RemoveCommand will remove the requested Record object from
the RecordList via the deleteRecordAt(recordIndex) method call of the RecordList class, where recordIndex refers
to the index of the requested Record to delete. Upon successful addition or deletion, the state of the RecordList
will be saved into the save file via the method call storage.saveData(recordList, creditScoreReturnedLoansMap).
When any of the Finux’s components is required to retrieve a Record object from the RecordList, the following methods
are utilized:
getRecordAt(recordIndex)method is used to retrieve aRecordobject from theRecordListat the specifiedrecordIndex.getRecordCount()method is used to retrieve the number ofRecordobjects stored within theRecordList.
Combining the above two methods, one can loop through the entire RecordList in a ‘for loop’ fashion as shown in the
following snippet of pseudo code:
LOOP FROM i←0 to i<getRecordCount()-1
PRINT getRecordAt(i)
END LOOP
3.7 CreditScoreReturnedLoansMap Component
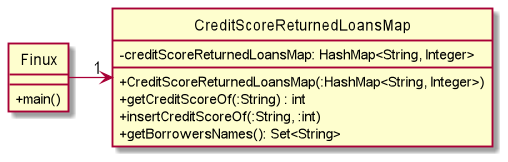
Figure 12: CreditScoreReturnedLoansMap Class Diagram
Description
The CreditScoreReturnedLoansMap component consists of only one class which is the CreditScoreReturnedLoansMap.
The role of the CreditScoreReturnedLoansMap is to maintain an internal HashMap of borrower names mapped to their
respective credit score, inserted throughout Finux’s execution. The credit score referred to in this case is computed
based on the list of confirmed returned loans made by the borrower and is not the final score.
Design
Similar to RecordList, the maintenance of CreditScoreReturnedLoansMap is also achieved through the
OOP style, where operations relating to the internal HashMap can only be performed through the defined interfaces
in CreditScoreReturnedLoansMap class. By adopting this design, it allows us to restrict the access to the internal
HashMap from the external classes, hence satisfying the information hiding aspect under the Encapsulation concept of OOP.
When Finux starts up, Finux instantiates the CreditScoreReturnedLoansMap with data loaded from the save file,
finux.txt. This is done by the Finux class calling the constructor CreditScoreReturnedLoansMap(HashMap), passing
in the HashMap returned from the method call storage.getMapData(). This HashMap returned from
storage.getMapData() is loaded from the save file by a prior method call storage.loadFile(), also performed by the
Finux class. For more information on Storage component, refer to section 3.8.
When any of the commands of the listed features in section 4 are requested to run, Finux will pass the
CreditScoreReturnedLoansMap into execute() method call of the respective commands’ classes for their intended
operations. As of V2.1 implementation, only both ReturnCommand and CreditScoreCommand operate on
CreditScoreReturnedLoansMap. When a loan is marked as returned by the ReturnCommand, the command will first retrieve
the borrower’s credit score from CreditScoreReturnedLoansMap via CreditScoreReturnedLoansMap#getCreditScoreOf().
If the borrower’s name does not exist in CreditScoreReturnedLoansMap, getCreditScoreOf() will return a max
credit score of 100, indicating that the borrower is trustable based solely on his loan history of returned loans prior
to the current loan that has just been returned.
Next, the ReturnCommand will compute the days taken for the borrower to return this loan. With this information
together with the retrieved score, the ReturnCommand will recompute the borrower’s credit score by executing
Utils#computeCreditScore(). The formula used by Utils#computeCreditScore() is as described in
section 4.7. With this newly recomputed score, the ReturnCommand will proceed to update
CreditScoreReturnedLoansMap with the Borrower’s new credit score via
CreditScoreReturnedLoansMap#insertCreditScoreOf(). Upon successful update, the state of the
CreditScoreReturnedLoansMap will be saved into the save file via the method call
storage.saveData(recordList, creditScoreReturnedLoansMap).
Lastly, when the CreditScoreCommand is requested by the user, the command will likewise
first retrieve the borrower’s credit score from CreditScoreReturnedLoansMap via
CreditScoreReturnedLoansMap#getCreditScoreOf(). With the retrieved value, the command will proceed to compute and
display the final credit score of the borrower as described in section 4.7.1.
3.8 Storage Component
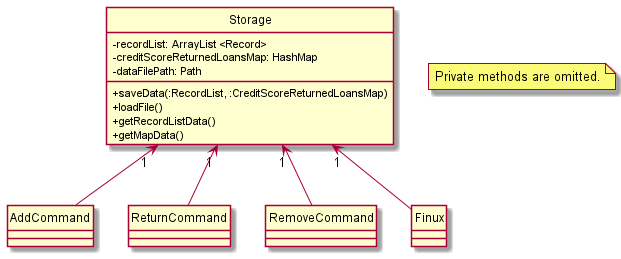
Figure 13: Storage Class Diagram
Description
The storage component consists of only 1 class called Storage. The role of the Storage is to translate all
records from the RecordList and CreditScoreReturnedLoansMap (a HashMap) into a text format in a text output file and
vice versa.
Design
In the application, Storage is instantiated in classes that requires the use of the save or load function, this
is done through the constructor new Storage(). Whenever a new record gets added, removed, or marked as returned,
the saveData method will be called and all record up to that point will be converted into a text output
and saved into the finux.txt file. The creditScoreReturnedLoansMap will also be translated into a user readable text format
and stored in the same file as the records. The loadFile method will do the exact opposite, and load the data from
the finux.txt file back into the Finux application.
-
saveData()is the method that is called after anyRecordare added, deleted, or marked as returned. It will then call thewriteToSaveFile()method. -
writeRecordListToSaveFilewill add the currently addressedRecordListand all its stored records into thefinux.txtfile after calling theconvertFileFormatmethod from the Record class. ThewriteToSaveFile()method will also output each individual records in separate lines. -
writeCreditScoreMapToSaveFilewill convert all key:value pairs, in this case,borrowerName:creditScorepairs in thecreditScoreReturnLoansMapinto a user readable format and store them in the samefinux.txtfile as therecords. -
loadFilemethod does the opposite of thewriteRecordListToSaveFile()method. In theloadFile()method, a newArrayList<Record>is instantiated. It will then call thesaveFileExist()method. If the method returns false,initSaveFile()method will be called and a newfinux.txtwill be created in the same directory of the FINUX application. TheloadFile()method will then return a new and emptyArrayList<Record>back to thestart()method in theFinuxclass. Should thesaveFileExist()returns true, for each line of text in thefinux.txtfile will be parsed into theparseRecord()method which will call the individual load methodsloadExpense(),loadLoan(),loadSaving()based on a REGEX expression of the text data. Should the pattern be unrecognisable, or the file is unable to be read, an exception will be thrown to thestart()method and FINUX will terminate. If all the text data is properly loaded, theloadFile()method will return theArrayList<Record>to theRecordListobject in thestart()method. -
initSaveFile()method will create a newfinux.txtspecified by the constantSAVED_FILE_PATH. It will callUi#printSuccessfulFileCreation()on a successful creation of the file, but will throw anIOExcpetionif there was an error in creating the file. -
parseRawData()method will compare the pattern of the text in thefinux.txtand call the respective methodsloadExpense(),loadLoan(),loadSaving(),loadCreditScoreRawData()based on the pattern that matches theExpense,Loan,Saving, or thecreditScorepattern in the saved file. This method will throw an exception back to theloadFile()method if any of the REGEX pattern does not match. -
extractArg()is a “micro” parser component of theStorageclass. This method simply splits the raw data from thefinux.txtfile into an array and returns the argument that is referenced by the index to its caller method with their leading and trailing white spaces removed. -
loadExpense()will extract the individual components from the raw data parsed into it. This method will call theextractArg()method which returns the components that are addressed by the index after splitting up the raw save file. Theamountobject in this method will be converted into aBigIntegertype and theissueDatewill be parsed in thelocalDatetype. An exception will be thrown if eitheramountorissueDateis not in the right format which prevents them from being parsed into their respective types. It will then return a newExpenseobject to theparseRecord()method. -
loadSaving()works similar toloadExpense()method, where the only difference is that it returns a newSavingobject to theparseRecord()method. -
loadLoan()also works similar to bothloadExpense()andloadSaving()method, but in theloadLoan()method, it has a few extra parameters. The first being a booleanisReturn, where1signifies returned and0not returned. TheborrowerNameis the next variable in theLoanobject. And lastly, thereturnDate, thereturnDatewill only return not null if theisReturnboolean has a value oftrue. This method then returns a newLoanobject to theparseRecord()method.
Storage Component Design Consideration
- Regex pattern has to be strictly adhered to.
- Spacings between the
|and components have to be separated clearly. - Record components in the
finux.txtfile should not contain any extraneous|. - Each record’s regex pattern must be the same regardless of the type of the record.
- Spacings between the
- Save file has to exist.
finux.txthas to be created upon the first time start of the application .finux.txtis to be checked if exist before loading or creating a new file.
- Variable components of each
Recordobject has to be parsed properly.- As the save function saves these
Recordin a particular regex pattern and type, users who edit the save file directly may enter ambiguous characters like the|, thus each variable has to be parsed without any error thrown. - Error has to be thrown if the saved text is unable to be parsed, as allowing ambiguous values to be parsed into the application may cause unknown and unwanted outputs.
- As the save function saves these
4. Implementation
This section introduces the specific implementation details and design thought processes of some features in Finux.
4.1 Add Feature
The Add feature aims to allow users to add expense, loan, and saving records.
4.1.1 Current Implementation
The Add feature is facilitated by AddCommand.
When adding an expense add -e bread loaf -a 2.50 -d today, or
adding a savings add -s week's savings -a 100 -d 28/03/2021, or
adding a loan add -l loan to gerard -a 200 -d 12012021 -p Gerard,
the ParserHandler will parse the input for CommandHandler to create the AddCommand object.
By calling the execute() method,
- the respective
Expense,SavingorLoanobject is added into theRecordListby invokingaddRecord(Record). - Next, the
saveData(...)from theStorageobject is invoked to store the records to file. - Finally, a notification is printed onto the console with the help of
Ui.

Figure 14: Sequence Diagram for AddCommand
📝 The sequence diagram starts from Step 2 onward.
Given below is an example usage scenario of how AddCommand behaves at each step.
Step 1:
User executes the command add -e Company lunch -a 20.00 -d 02-04-2021.
The application invokes ParserHandler#getParseInput() to provide the parsed
input to CommandHandler#createCommand(). This checks for the command type, add, and proceeds to validate the
parsed input in the new AddCommand() constructor before returning the constructed AddCommand object to Finux.
Step 2:
The application next invokes the AddCommand#execute() to execute the user’s instruction.
Step 3:
Inside the AddCommand#execute(), the method conducts a check on the RecordType enumeration before creating
the Record object.
✔️
EXPENSEtype creates anew Expense(String,LocalDate,String)
✔️
LOANtype creates anew Loan(String,LocalDate,String,String)
✔️
SAVINGtype creates anew Saving(String,LocalDate,String)
Step 4:
The Record object is added into the RecordList object by invoking RecordList#addRecord(Record).
Step 5:
The RecordList object is written to file by invoking Storage#saveData(RecordList, CreditScoreReturnedLoansMap).
Step 6:
Lastly, a successful add message is printed by invoking Ui#printSuccessfulAdd(Record,int).
4.1.2 Design Consideration
This section shows the design considerations taken when implementing the add feature.
Aspect: How to manage multiple different options
For record types such as Expense and Saving, they do not require additional options.
But for Loan record type, it requires an extra option -p for the borrower name. Since the add command
supports many different options and option ordering is not strict, this will complicate validation.
The two choices to consider would be:
- Use regular expressions (regex)
- Use systematic validation
| Approach | Pros | Cons |
|---|---|---|
| Regular expressions | Less complicated validation procedure. | May need a very complicated regex String or multiple ones, for each Command. |
| Systematic validation | Option validation methods can be shared with other Commands. | Many option violations to check. |
Having considered two of the approaches, we have decided to adopt the second approach. Systematic validation is better in the long run. It allows for code re-usability and addition for more modular changes,
- i.e. addition of new options, tweaking validation procedures, etc…
Other than increased complexity of regex Strings, any changes to command and option structure requires a completely new regex String. Therefore, systematic validation is the preferred approach, for the current and future developers.
4.2 List Feature
The list feature allows the users to display the record’s information of the respective category of
expense, loan, and saving of the added records.
4.2.1 Current Implementation
The list feature is supported by the ListCommand. The user will enter list and followed up with the available
options, {-e | -l | -s | -a}, and the ParserHandler will parse the input for CommandHandler to create the
ListCommand object. The program then proceeds to call the execute() method, and the record’s information will be
displayed on the screen.
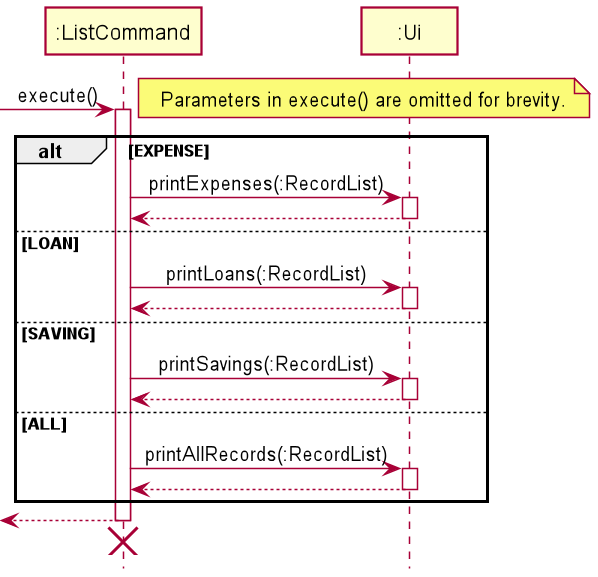
Figure 15: Sequence Diagram for ListCommand
📝 The sequence diagram starts from Step 2 onward.
Given below is an example usage scenario of how ListCommand behaves at each step.
Step 1:
The user execute the list command with one of the available options, {-e | -l | -s | -a}. The program
invokes ParserHandler#getParseInput() to provide the parsed input to CommandHandler#createCommand(). This checks
for the command type, list, and proceeds to validate the parsed input in the ListCommand() constructor
before returning the constructed ListCommand object to Finux.
Step 2:
The application next invokes the ListCommand#execute() to execute the user’s instruction.
Step 3:
Inside the ListCommand#execute(), the method conducts a check on the RecordType enumeration before executing the
respective method. The RecordType enumeration is used to identify the category such that the correct method would be
called. The following are the supported types found in RecordType enumeration:
✔️
EXPENSEtype invokesUi#printExpenses()
✔️
LOANtype invokesUi#printLoans()
✔️
SAVINGtype invokesUi#printSavings()
✔️
ALLtype invokesUi#printAllRecords()
Step 4:
The Ui will handle the respective invocation call. The basis for the four methods utilizes the for loop to
iterate through the recordList. For each iteration, instanceof was called to check for the respective record types.
If the record types are valid according to the respective method calls, their record’s information will be printed on
to the screen.
Step 5:
Lastly, the program will print out the record’s information with the help of getId() and the respective toString()
methods.
getId()andtoString()omitted for brevity in the sequence diagram.
4.2.2 Design Consideration
This section shows the design considerations taken when implementing the list feature.
Aspect: Whether to print as record ID or indices
Since we plan to allow the user to remove or return a record, we need a way to identify the record. Below are two proposed printout ideas:
- Index, e.g.
1. [E] [2021-01-01] [$1,000.00] Record 1 - Record ID, e.g.
[ID: 1] [E] [2021-01-01] [$1,000.00] Record 1
| Approach | Pros | Cons |
|---|---|---|
| Index | Classical approach | Might confuse the user |
| Record ID | Creates a better intuition | New method call is necessary for formatting the printout |
Having considered two of the approaches, we have decided to adopt the second approach.
As our remove and return features take in the number based on the listed records, it will be better to highlight the
record ID rather than just a single number printout to provide the user a better intuition. Although a new method call
getId() is needed, the price to pay is very little compared to confusing the user as indices can be interpreted
differently by different people.
4.3 View Feature
The view feature aims to allow the users to view the total expenditures, loans, and savings for the respective
category of expense, loan, and saving of the added records.
4.3.1 Current Implementation
The view feature is facilitated by ViewCommand. By typing in view and followed up with the available options,
{-e | -l | -s | -a}, the ParserHandler will parse the input for CommandHandler to create the ViewCommand object.
By calling the execute() method, the total amount will be printed onto the console with the help of Ui.

Figure 16: Sequence Diagram for ViewCommand
📝 The sequence diagram starts from Step 2 onward.
Given below is an example usage scenario of how ViewCommand behaves at each step.
Step 1:
The user execute the view command with one of the available options, {-e | -l | -s | -a}. The program invokes
ParserHandler#getParseInput() to provide the parsed input to CommandHandler#createCommand(). This checks
for the command type, view, and proceeds to validate the parsed input in the ViewCommand() constructor
before returning the constructed ViewCommand object to Finux.
Step 2:
The application next invokes the ViewCommand#execute() to execute the user’s instruction.
Step 3:
Inside the ViewCommand#execute(), the method conducts a check on the RecordType enumeration before executing the
respective method. The RecordType enumeration is used to identify the category such that the correct method would be
called. The following are the supported types found in RecordType enumeration:
✔️
EXPENSEtype invokesUi#printTotalAmountExpense()
✔️
LOANtype invokesUi#printTotalAmountLoan()
✔️
SAVINGtype invokesUi#printTotalAmountSaving()
✔️
ALLtype invokesUi#printTotalAmountAllType()
Step 4:
The Ui will handle the respective invocation call. The basis for the four methods utilizes the for loop to
iterate through the recordList and will only add to the totalAmount if it is an instance of the respective
record type.
📝 The
Ui#printTotalAmountLoan()will imposed additional check on whether the record is returned. Only records that are not returned will be added to thetotalAmount.forloop is omitted for brevity in the sequence diagram.
Step 5:
Finally, the totalAmount will set to two decimal place before printing onto the console.
4.3.2 Design Consideration
This section shows the design considerations taken when implementing the view feature.
Aspect: How many figures should the amount be allowed up to
Since it is entirely possible that the amount provided by user to be very large or very small, the two choices to consider would be:
- Integer (Classic approach)
- BigDecimal (Non-classic approach)
| Approach | Pros | Cons |
|---|---|---|
| Integer | No additional class required | Limited to a fix amount of digit available to enter |
| BigDecimal | Allow more digits than classic approach | Need to create a BigDecimal object |
Having considered two of the approaches, we have decided to adopt the second approach. The deterministic factor was the possibility of very large number such as 1000 billions. Thus, covering more than what the integer data type provided can cater to higher flexibility of the application.
4.4 Return Feature
The return feature aims to allow users to mark a loan as return after querying the ID with the list command. The
users will be able to then use the return command to mark a loan as return when they deem it as returned. Hence, this
feature allows them to update loan records accordingly whenever necessary.
4.4.1 Current Implementation
The return feature is facilitated by ReturnCommand. By running the command with required options and relevant
parameters, our CommandHandler will construct the ReturnCommand object which will validate the input and provide
the validated parameters that will be used in the execute function.
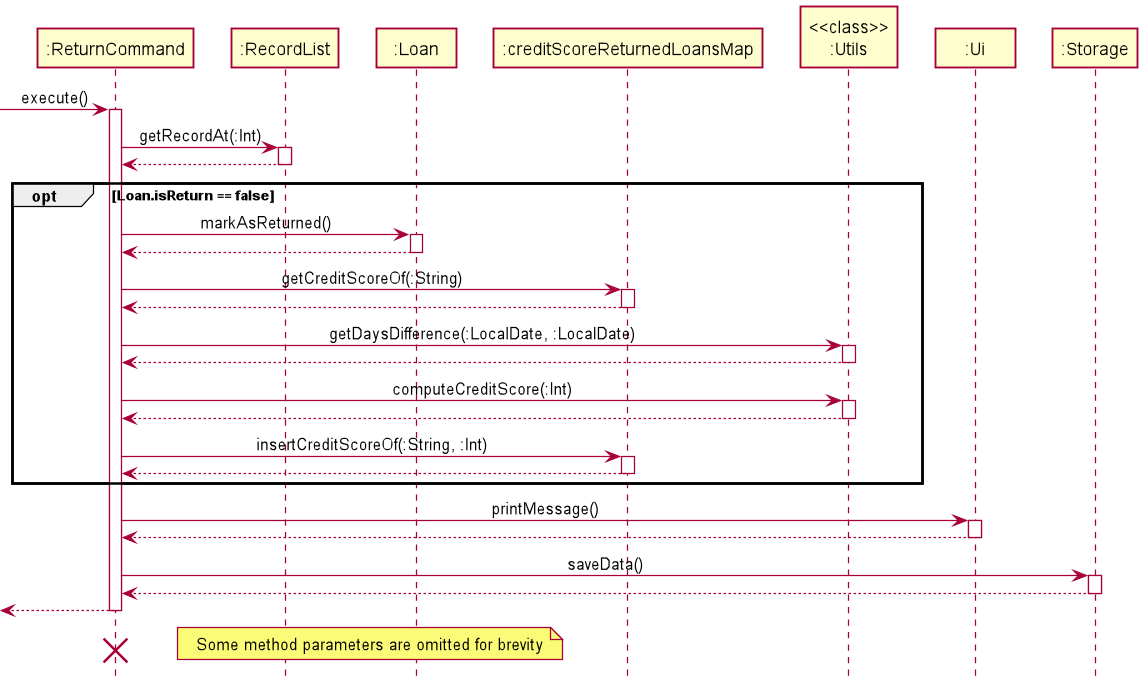
Figure 17: Sequence Diagram for ReturnCommand
The sequence diagram presented above depicts the interaction between the components for running the command.
return -i 1 -d 2021-03-28.
📝 The sequence diagram starts from Step 2 onward.
Given below is an example usage scenario of how ReturnCommand behaves at each step.
Step 1:
User executes the command return -i 1 -d 2021-03-28. The application invokes CommandHandler#createCommand(), and
since the command type is return, the CommandHandler#createCommand() constructs a ReturnCommand object. The parameter validation
of the constructed ReturnCommand is done in the constructor. The validation is done by invoking the commands:
ReturnCommand#getIndexInString(), ReturnCommand#getIndexInInteger() and ReturnCommand#getDate(). The created command is
then returned to Finux.
Step 2:
The CommandHandler terminates after validating user input and creating the corresponding Command object. The
application invokes ReturnCommand#execute() to execute the user’s instruction.
Step 3:
The ReturnCommand first invokes RecordList#getRecordAt(:Int) to get the record located at index
recordNumberInt and is stored in currentRecord. The record retrieved will be used in the next step.
📝
recordNumberIntis a value that you see on the list minus by one.
Step 4:
The currentRecord object is then type-casted to a Loan object. This type-casted object will be stored in currentLoan.
This currentLoan will then be used to make necessary computations of the creditscore of the person associated with the
loan.
Step 5:
If the loan is not returned, the Loan#markAsReturned(). Then steps 6 to 7 will be carried
out. Otherwise, these steps will be skipped.
Step 6:
Convert the person associated with the loan to lower case. Then invoke the method
creditScoreReturnedLoansMap#getCreditScoreOf(:String) to retrieve to current credit score of the
person. Then, the Utils#getDaysDifference(:LocalDate, :LocalDate) is invoked to
retrieve how many days it took for the person to return the loan.
Step 7:
The information derived from step 6 is then used to compute the new credit score by calling the method
Utils#computeCreditScore(:long, :Int, :bool). This newly computed credit score is
then stored by invoking creditScoreReturnedLoansMap#insertCreditScoreOf(:String, :Int).
Step 8:
The application invokes Ui#printMessage() and prints the record that will be marked as return with their respective
toString() method.
Step 9:
The application invokes Storage#saveData() to save the modification on the record list onto the save file after the
updates on the loan is done successfully. This will then enable future file loading to be accurate and there are no
mismatch of information or records.
4.4.2 Design Consideration
This section shows the design considerations taken when implementing the return feature.
Aspect: When should the application validate the user inputs
These user inputs include:
- index
- date
It is entirely possible that the index or date provided by the user can be invalid.
For indices:
- negative numbers
- numbers that refer to non-existent records
- non-numerics (e.g. alphabets, symbols, etc.)
For dates:
- incorrect date format
- not a date
- future dates or non-existent dates (30th February)
There is a need to validate the index given by the user to ensure that the application does not terminate unexpectedly and that suitable error messages are printed to notify the user of their intentional or unintentional incorrect parameter inputs.
| Approach | Pros | Cons |
|---|---|---|
| During command execution. | No additional class required. | A new argument for the execute() method is needed. It also increases coupling and decreases cohesion. |
| During command creation. | Decreases coupling and increases cohesion as there is a clear cut in between responsibilities. The arguments of execute() can remain consistent with other command types. |
Duplication of validation may occur in other commands. |
Having considered two of the approaches, we have decided to implement the second approach which is to validate the index
and date during command creation. The lower coupling and higher cohesion won the battle here and also the consistency of
the arguments in execute() can also be maintained.
4.5 Remove Feature
The remove feature aims to allow users to remove records after querying the record’s
ID with the list command. The users will be able to then use the remove
command to delete certain records that they deem obsolete or is incorrect. Hence, this feature
allows them to amend their mistakes or edit their list with constraints.
4.5.1 Current Implementation
The remove feature is facilitated by RemoveCommand. By running the command with required options and relevant
parameters, our CommandHandler will construct the RemoveCommand object which will validate the input and provide
validated parameters that will be used in the execute function.
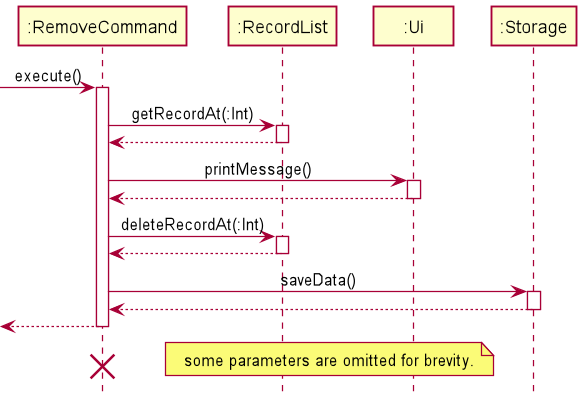
Figure 18: Sequence Diagram for RemoveCommand
The sequence diagram presented above depicts the interaction between the components for running the command.
remove -i 1.
📝 The sequence diagram starts from Step 2 onward.
Given below is an example usage scenario of how RemoveCommand behaves at each step.
Step 1:
User executes the command remove -i 1. The application invokes CommandHandler#createCommand(), and since the
command type is remove, the createCommand constructs a RemoveCommand object. The validation of the constructed
RemoveCommand is done in the constructor. The created command is then returned to Finux.
Step 2:
The CommandHandler terminates after parsing user input and creating the corresponding Command object. The application
invokes RemoveCommand#execute() to execute the user’s instruction.
Step 3:
The RemoveCommand first invokes RecordList#getRecordAt(:Int) to get the record located at index
recordNumberInt. The record retrieved will be used in the next step.
📝
recordNumberIntis a value that you see on the list minus by one.
Step 4:
The application invokes Ui#printMessage() and prints the record that will be removed with their respective
toString() method.
Step 5:
The application invokes RecordList#deleteRecordAt(:Int) which removes the record located at the index
recordNumberInt.
Step 6:
The application invokes Storage#saveData() to save the modification on the record list onto the save file after the
removal of the record is successful. This will then enable future file loading to be accurate and there are no mismatch
of information or records.
4.5.2 Design Consideration
This section shows the design considerations taken when implementing the remove feature.
Aspect: When should the application validate the user input index
Since it is entirely possible that the index provided by the user can be invalid where the indices may be one of the following:
- negative numbers
- numbers that refer to non-existent records
- non-numerics (e.g. alphabets, symbols, etc.)
There is a need to validate the index given by the user to ensure that the application does not terminate unexpectedly and that suitable error messages are printed to notify the user of their intentional or unintentional incorrect parameter inputs.
This consideration is much similar to the one in Return Feature
| Approach | Pros | Cons |
|---|---|---|
| During command execution. | No additional class required. | A new argument for the execute() method is needed. It also increases coupling and decreases cohesion. |
| During command creation. | Decreases coupling and increases cohesion as there is a clear cut in between responsibilities. The arguments of execute() can remain consistent with other command types. |
Duplication of validation may occur in other commands. |
Having considered two of the approaches, we have decided to adopt the second approach which is to validate the index
during command creation. The lower coupling and higher cohesion was the deterministic factor here and also the
consistency of the arguments in execute() can also be maintained.
Aspect: The way the index is specified(option)
As the user has to specify the index of which record to remove, the index has to be provided but is -i required?
| Approach | Pros | Cons |
|---|---|---|
Have to use -i |
The options will be consistent with the return command as it requires the user to input an index as well |
Extra time is used to enter 2 more characters just to satisfy the application requirement where the remove command actually only need one parameter. |
Do not have to use -i |
Saves the time needed to input the 2 characters. | It will be inconsistent to require users to include -i for the return command but not for the remove command. |
With the two approaches considered, we have decided to adopt the first approach as it gives consistency for the user experience, and it will not cause any confusion. The time wasted is negligible, and the consistency provides long-term benefit.
4.6 Storage Feature
The storage feature allows all record and creditScoreReturnedLoansMap to be stored locally on the device and for record
and creditScoreReturnedLoansMap to be loaded from a saved file into the Finux application. This is the only feature implemented
that does not have an explicit command to call it.
4.6.1 Current Implementation
As the saving and loading methods have no explicit command calls, these methods are invoked by methods from the other
classes. During the launch of the Finux application, in the start() method, getRecordListData() is called to load the
data from the saved file: finux.txt.
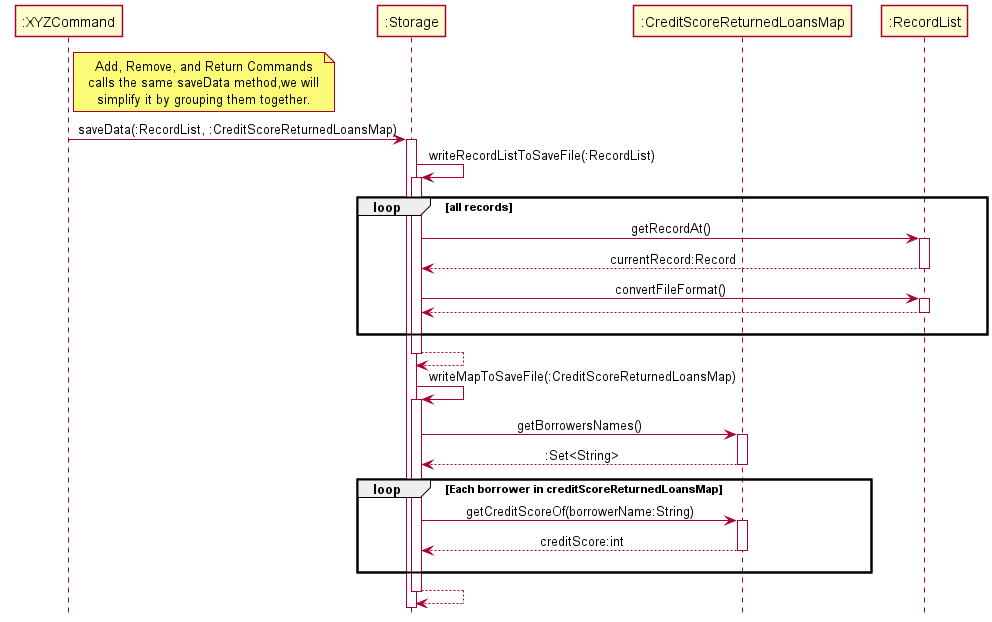
Figure 19: Sequence Diagram for Storage’s save function
Saving of data works differently, the data will be automatically saved into finux.txt only with a few
particular command calls, these calls are the commands that will alter the records in the RecordList. As
the creditScoreReturnLoansMap is also altered by changes in the Loans object. It will also be stored and updated
together with the commands below.
The following commands and scenarios where these records will be saved locally into the save file:
addremovereturn
The sequence below will show you how the Storage class behaves at each step. As all three methods above generally
behave similarly in the way they call the saveData() method, the following will be generalised to prevent repetition
for all the three methods above.
Step 1
Before the end of the add, remove or return command, the saveData() method will be invoked.
Step 2
The saveData() method will then call on the writeRecordListToSaveFile() method. This method will pass the
recordList back to the RecordList class to invoke the getRecordAt() method.
Step 3
The getRecordAt() method will return the record that is identified by its index. With this record, the
method writeRecordListToSaveFile() will then call on the convertFileFormat() method in the RecordList class. This
method will convert the record that is stored in the recordList into a text readable format.
Step 4
The text format of the record will then be written into the finux.txt file through the FileWriter#write() method.
Step 5
The writeRecordListToSaveFile() will repeat Steps 2 to 4 until the last record in the recordList, and each
record will be written and separated by a newline.
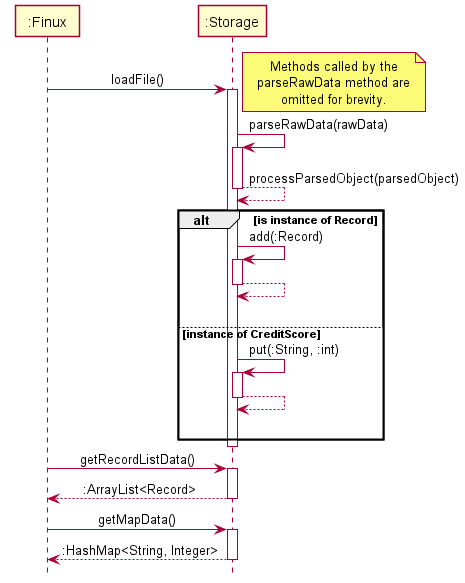
Figure 20: Sequence Diagram for Storage’s load function
Finux will automatically load the data from the save file: finux.txt. When the Finux application is launched, the
data from the file will be loaded during the initialising phase, even before the welcome message is printed. The error
and exception handling is omitted from the diagram above as the application will print a failed initialization message
and terminate.
Step 1
When the user launches the finux.jar application, in the start method. The loadFile() method will be invoked.
Step 2
The loadFile() method will first check for the save file, if it exists it will then call upon the parseRawData() method
which will read and match the contents of the finux.txt file with the regex patterns. It will then call on the
respective methods to return the object type of it. (In this case, Expense, Loan, Savings,
CreditScoreReturnLoansMap)
Step 3
With the returned objects, they are now parsed into the processParsedObject method to be added into their respective
classes. With the instances of Record being added into an ArrayList<Record> and the creditScoreReturnedLoansMap
into a HashMap<String, Integer>.
Step 4
The start method in the Finux class will then call the getRecordListData() method to retrieve the loaded
ArrayList<Record> from the Storage class and to load it into the RecordList object, this is also the same with the
CreditScoreReturnedLoansMap where the start() method in the Finux class will call the getMapData() method from the
Storage class which will then return the HashMap<String, Integer> and load it into the CreditScoreReturnedLoansMap
object.
4.6.2 Design Consideration
This section will walk you through the design considerations taken when implementing the remove feature.
Aspect: When should the data be saved into a local file
Since we do not have an explicit function call to save the files, the data should be automatically saved but there are multiple occasions that this can be invoked:
- On exit
- After each command call
- After any command call that edits data in
RecordList
| Approach | Pros | Cons |
|---|---|---|
| On Exit | Save just has to be called exactly once, minimal coupling | If program crashes before exit is called, all data will be lost |
| After each command call | Guaranteed save after every successful command call, users can “save” the data by simply entering any legal commands | Extraneous calls of save, high coupling, a lot of passing of data around |
After any command call that edits data in RecordList |
Allows data to be saved after every update to the RecordList |
Some coupling between the methods that updates the records and calling the save method. |
💡 Note that data in the
CreditScoreReturnedLoansMapis related directly to theLoanobject in theRecordList, thus we have omitted the mention of it here as any changes to theCreditScoreReturnedLoansMapwill also be reflected in theLoanobject which is a part of theRecordList.
After considering the above approaches, we have decided to adopt the third approach even though there might be more coupling than the first method. By choosing the third approach, we can ensure that our data is stored safely and as compared to the second approach, the third approach minimises the coupling within our methods.
4.7 Credit Score Feature
The creditscore feature aims to provide users with a way to assess the credibility of his/her borrowers through
a point scoring system. On a high level view, credit score ranges from 0 to 100 inclusive, and is generally computed
based on the following pseudo code:
IF DAYS_TAKEN_TO_RETURN < 7:
CREDIT_SCORE += 5
ELSE IF DAYS_TAKEN_TO_RETURN <= 14:
CREDIT_SCORE -= 10
ELSE IF DAYS_TAKEN_TO_RETURN <= 28:
CREDIT_SCORE -= 20
ELSE:
CREDIT_SCORE -= 50
4.7.1 Current Implementation
The creditscore feature is facilitated by the CreditScoreCommand. By providing the name of a borrower as an argument
to the CreditScoreCommand, the ParserHandler will parse the input for CommandHandler to create an instance of
CreditScoreCommand. Upon successful creation, the execute() method of the instance will be called to compute and
display the credit score of the borrower.

Figure 21: Sequence Diagram for CreditScoreCommand
Step 1
User enters the command creditscore Mark. Finux class invokes ParserHandler#getParseInput() to provide the parsed
input to CommandHandler#createCommand(). Since the command requested by the user in this case is the
CreditScoreCommand, an instance of the CreditScoreCommand is created and returned by createCommand() to the Finux
class. Validation of the input provided to CreditScoreCommand is performed by the constructor new CreditScoreCommand()
during the creation of this instance.
Step 2
Finux class executes the CreditScoreCommand#execute() to compute and display the credit score of the borrower.
Step 3
Within the execute() of the CreditScoreCommand class, the method first retrieves the borrower’s credit score via
CreditScoreReturnedLoansMap#getCreditScoreOf(). This retrieved score is computed based on the list of confirmed
returned loans made by the borrower and is not the final score. Data stored within CreditScoreReturnedLoansMap are
computed by the ReturnCommand, when a loan is marked as returned.
Step 4
Continuing the computation from the score retrieved in step 3, the method proceeds to loop through the entire RecordList.
Step 5
Within each iteration, a Record object is first retrieved via RecordList#getRecordAt(). If this retrieved Record
object is an instance of the Loan class, the method will proceed to check if the loan represented by this loan object
is being loaned to the specified borrower (in this example, Mark) and has not yet returned.
Step 6
If true, the method will proceed to call Utils#getDaysDifference(), which will compute the difference in
days between the current date and the issue date of the loan.
Step 7
Next, Utils#computeCreditScore() will be used to compute a new credit score of the borrower. This computation is
cumulative to the score retrieved in step 3 and takes into account of the value computed in step 6. The formula used
by Utils#computeCreditScore() is as described above in the
introduction section of Credit Score Feature.
Step 8
Lastly after the loop mentioned in step 3 ends, the final score is displayed onto the console via the UI component.
4.7.2 Design Consideration
This section shows the design considerations taken when implementing the Credit Score Feature.
Aspect: How can we preserve the accuracy of the credit score system?
As the credit score calculation is calculated based on the loan records of a borrower, the following methods of calculation can be implemented:
- Calculating the credit score at run time based on the current contents of the record list.
- Persisting the credit score of returned loans by storing into the save file.
| Approach | Pros | Cons |
|---|---|---|
| Non-persistent | Straight forward and no additional resources needed | Credit score is bias towards the current record list and does not factor in any borrowing history |
| Persistent | Provide a more accurate credit score computation based on the borrower’s borrowing history regardless of the current contents of the record list | Additional resources required to save each borrower’s current score when exiting the program |
Having considered the two approaches, we have decided to adopt the second approach. To preserve the accuracy of the credit score system, the persistence of each borrower’s credit score starting from the very first loan made to them, to throughout the entire application lifetime is important. This will ensure that the loan history is persisted on every new startup, and hence factored in every instance of the credit score computation. Even though there is the downside arising from the extra memory space needed, it is a small price to pay as compared to the benefits it brings to the user when enhancing their decision on loaning money to others.
Appendix A: Product Scope
A.1 Target User Profile
- Computing students
- Students with background in CLI interface
- Students that prefer typing in CLI over traditional GUI clicking
- Students that need to track their expenses, loans, and savings
- Students that lend money to their friends
A.2 Value proposition
A.2.1 Problem Identification
Problems faced by students that Finux aim to assist with.
- [Problem] Wastage of time due to poor connection/latency issues when accessing finance tracking website.
-
[Solution] Provide a non website dependent application.
- [Problem] Hassle to use different applications to keep track of various stuff.
-
[Solution] Provide an integrated platform to record any expenses, loans, or saving.
- [Problem] Disorganization issues arising from keep multiple tracking applications.
-
[Solution] Provide the option to view each category of records within an integrated platform.
- [Problem] Spending additional time to gauge whether to lend money to a friend.
- [Solution] Provide a soft gauge through credit score meter.
A.2.2 Value Adding
Finux aims to integrate the process of managing and keeping track of financial status without the need to access online websites and using different applications to keep track of different loans and expenditures. Finux provides an all-in-one platform for students who are usually in front of their computers. The student’s expertise in coding and typing can speed up the process of their finance management through the CLI interface.
❗ Finux does not provide any finance advise.
Appendix B: User Stories
| Version | As a … | I want to … | So that I can … |
|---|---|---|---|
| v1.0 | user | be able to add a record (expense) with dates | record each expense into the app. |
| v1.0 | clumsy user | be able to delete wrong inputs | easily rectify errors in the record list. |
| v1.0 | debt collector (Student) | list down a list of people who owes me money with a deadline | make sure that they return their money. |
| v1.0 | student | list each and every incurred expense | better manage my daily/weekly expenses. |
| v1.0 | SOC student | have a CLI style money management system | accomplish tasks faster typing on a CLI compared to clicking on a GUI. |
| v1.0 | user | be able to view the total expenditure, saving and loan credit | know the total amount of each category for planning and viewing. |
| v1.0 | debt collector (Student) | mark a loan as returned | know which loans are returned to me. |
| v1.0 | new user | know the list of commands | use the app correctly. |
| v2.0 | new user | know what function I can use | tell what are the valid inputs for the application. |
| v2.0 | lender | know the loanee’s punctuality on returning the loan | gauge who to continue lending money the next time. |
| v2.0 | student | know how trustworthy a person is according to a score indicator | decide how risk-free it is to lend money to the said person. |
Appendix C: Non-Functional Requirements
- The application should be responsive.
- The application should work on most operating systems (OS) such as Windows and Linux with
Java 11installed. - Users who can type fast should be able to complete equivalent tasks faster as compared to using a mouse.
- Users should be able to use the application with ease with the help of the User Guide (UG) and the Developer’s Guide (DG).
Appendix D: Instructions for manual testing
D.1: Launch and Shutdown
Initial Launch
- Download the jar file and copy it into an empty folder where the application will save its files in.
- Open a new command prompt (Windows) or terminal (MacOS) and navigate to the directory containing
finux.jar. - Enter the command
java -jar finux.jarto launch Finux. - Program will create a new save file if there are currently no existing save file, else it will load the save file.
Shutdown
- To exit Finux, enter the
exitcommand.
D.2: Adding an expense to the record list
- Prerequisite: None.
- Test case:
add -e Plain bread loaf -a 2.50 -d 28/03/2021Expected: Adds anexpensewith the description ‘Plain bread loaf’ with an amount of2.50dollars on28th March 2021. - Test case:
add -e Gym equipment -a 500 -d 02/04/2021Expected: Adds anexpensewith the description ‘Gym equipment’ with an amount of500dollars on2nd April 2021. - Other incorrect commands to try:
addadd -eadd -e -aadd -e -a -dadd -e lunch -a x -d 28/03/2021(wherexis a negative number or a word)
D.3: Adding a loan to the record list
- Prerequisite: None.
- Test case:
add -l 1st loan to Mark -a 200 -d 20/03/2021 -p MarkExpected: Adds aloanwith the description ‘1st loan to Mark’ with an amount of200dollars on20th March 2021. The loan is associated withMark. - Test case:
add -l 1st loan to Jason -a 520 -d 01/04/2021 -p JasonExpected: Adds aloanwith the description ‘1st loan to Jason’ with an amount of520dollars on1st April 2021. The loan is associated withJason. - Other incorrect commands to try:
addadd -ladd -l -aadd -l -a -dadd -l -a -d -padd -l loan to Andy -a x -d 28/03/2021 -p Andy(wherexis a negative number or a word)
D.4: Adding a saving to the record list
- Prerequisite: None.
- Test case:
add -s Savings from March -a 1000 -d 29/03/2021Expected: Adds asavingwith the description ‘Savings from March’ with an amount of1000dollars on29th March 2021. - Test case:
add -s Savings from April -a 1200 -d 29/03/2021Expected: Adds asavingwith the description ‘Savings from April’ with an amount of1200dollars on29th April 2021. - Other incorrect commands to try:
addadd -sadd -s -aadd -s -a -dadd -s Savings from Intern -a x -d 30/03/2021(wherexis a negative number or a word)
D.5 Listing expense(s) in the record list
- Prerequisite: None.
- Test case:
list -eExpected: Lists all theexpensescurrently in the record list.
D.6 Listing loan(s) in the record list
- Prerequisite: None.
- Test case:
list -lExpected: Lists all theloanscurrently in the record list.
D.7 Listing saving(s) in the record list
- Prerequisite: None.
- Test case:
list -sExpected: Lists all thesavingscurrently in the record list.
D.8 Listing all records in the record list
- Prerequisite: None.
- Test case:
list -aExpected: Lists all the records currently in the record list.
D.9 Viewing total expense amount in the record list
- Prerequisite: None.
- Test case:
view -eExpected: Views the total amount of expenses currently in the record list.
D.10 Viewing total loan amount in the record list
- Prerequisite: None.
- Test case:
view -lExpected: Views the total amount of loans currently in the record list.
D.11 Viewing total saving amount in the record list
- Prerequisite: None.
- Test case:
view -sExpected: Views the total amount of savings currently in the record list.
D.12 Viewing total record amount in the record list
- Prerequisite: None.
- Test case:
view -aExpected: Views the total amount of all records currently in the record list.
D.13 Mark a loan as returned
- Prerequisite:
- Assuming your current record list is empty.
- The record list must contain a loan record.
- Add a loan into the list
add -l Loan to Jason -a 500 -d 28/03/2021 -p Jason
- Test case:
return -i 1 -d 02/04/2021Expected: The loan with record ID 1 will be marked as returned and will be indicated with[v]at the end of the entry in the record list. - Other incorrect commands to try:
returnreturn -ireturn -i -dreturn -i x -d y(wherexis a negative number or a word,yis an invalid date)
D.14 Remove a record from the record list
- Prerequisite:
- Assuming your current record list is empty.
- The record list must contain any instance of record (
Expense,Loan,Saving) - Add a record into the list
add -e Chicken Rice Lunch at Deck -a 2.50 -d 30/03/2021
- Test case:
remove -i 1Expected: The record with record ID 1 will be removed from the record list. - Other incorrect commands to try:
removeremove -iremove -i 0remove -i x(where x is any integer that is greater than the size of the array or a negative integer)
D.15 Checking the CreditScore of a person
- Prerequisite:
- Assuming your current record list is empty.
- The record list must contain a loan record.
- Add a loan into the list
add -l Loan to Jason -a 500 -d 28/03/2021 -p Jason - Mark the loan as returned
return -i 1 -d 10/04/2021
- Test case:
creditscore jasonExpected: The credit score shown should be 90 instead of 100 (default). - Other incorrect commands to try:
creditscorecreditscore -p jasoncreditscore -i x(where x is any integer)
💡 Note: The creditscore command will also calculate the person’s credit score should the loan not be returned.
D.16 Displaying the help list
- Prerequisite: None.
- Test case:
helpExpected: The summary table of all commands and format will be displayed. - Test case:
help x(where x is a valid command) Expected: The detailed explanation ofxcommand will be displayed. - Other incorrect commands to try:
help -ihelp -i 0help y(where y is an invalid command)
D.17 Exiting Finux application
- Prerequisite: None.
- Test case:
exitExpected: Finux application exits and displays the exit message.